


1.e4 c5 2.d4 cd 3.c3 dc 4. Nc3 d6 5.Bc4 Nc6 6.Nf3 Nf6 7.e5!
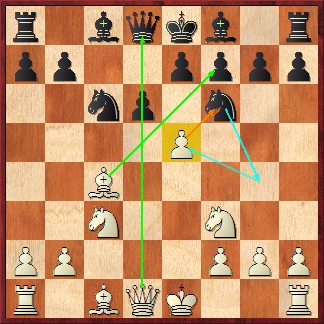
7…de 8. Qd8!
So.. With no better choice the Queen has to be captured with the knight.
B.) 8… Nd8
Now white could capture the pawn after 9.Ne5, the nice mobilization allows even more powerful aims.
9. Nb5!
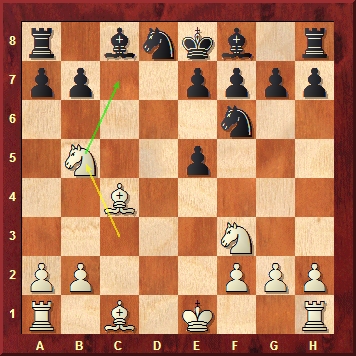
White intends Nc7 winning the full rook. Black suddenly has no good answers.
The attempt to cover c7 after 9 …Kd7??, simply leads to the mate after 10. Ne5 Ke8 11. Nc7 checkmate.
After 9… Ne6 white immediately eliminates the knight after 10.Be6 Be6 and invades on c7 square with the decisive fork 11. Nc7+! Winning the rook.
No help either is 9… Be6 – black is hoping for 10. Be6? Ne6 covering the c7 square, nevertheless white wins easily after 10. Nc7! Kd7 11.Na8 Bc4 for a short while look like black is fine – the Na8 is trapped and black could hope to capture it soon. But here came the surprise 12. Ne5+! With the check – the Bishop c4 is lost.
The only precise defense
9… Rb8
indeed after
10.Ne5!
white creates the threat Nc7 checkmate.
10… e6
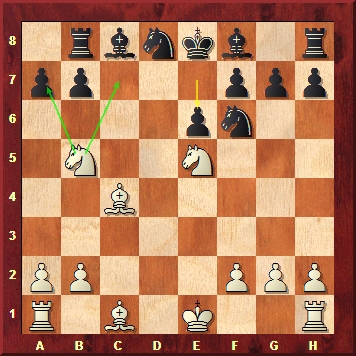
now white could simply take the pawn 11.Na7 or continue the attack after
12. Nc7+ Ke7 13.b3!

Gaining more development due the mating threat Ba3!
Lets just evaluate the position. White has completed his development, when the black pieces are just on the back rank. Thus white easily exploits an ugly position of the King on e7 by increasing their pieces activity and keeping an unpleasant pressure.
The main conclusion:
In the Morra gambit black has to be extremely careful. One slip could cause an immediate disaster as I have shown above.
Filed under: Morra Gambit |


But what about 6)…a6, which should avoid tricks with e5 and Nb5? After that, is there anything to stop black from playing …Nf6 and …Bg4, as you mentioned earlier in the series?
Follow the next lectures regarding the Morra …
As for the last position, Black has the move – 13…Kd6 – forking both the Knights and avoiding the mate threat. What should White do then?
Thanks for your reply!
Jabe
Jabe, After 14. Bf4 followed by 15.000 Black is in big trouble. The threat is to transfer the f4 bishop back to black squares to attack the Black king on the a3 – f8 diagonal.
A funny thing is that the computer shows 13….Ndz 14. Ba3 Kf6 as OK for black. And it can not find 15. Ne8. I played it in last Chicago Open and the agme ended quite fast, but the ciomputer estimates it as winning for black. One more argument for ideas beating matter.
That is 13… Nd7 not 13…Ndz.
I am so glad I discovered this weblog. Thank you for the facts. You make a good deal of great points in your write-up. Rated 5 stars!
Hello, i think that i saw you visited my site thus i came to “return the favor”.I am attempting to find things to enhance my site!I suppose its ok to use a few of your ideas!!