


Sample game # 6
1.e4 c5 2.d4 cxd4 3.c3 dxc3 4.Nxc3 Nc6 5.Bc4 e6 6.Nf3 Qc7 7.0-0 a6
Another attempt. Black prevents any business with the Nb5 attack.
8.Qe2!
This move is the part of the whole setup. The Queen is freeing the place for the King’s rook, which gets ready to start the pressure over the “d” file.
8…Nf6?!
A careless move. Black would do better to prevent white from the next aggressive operation. I would recommend 8… d6 as the best response.
9.e5!
A very interesting move leading to a very sharp battle.
Here you could see another point of the effective 8.Qe2! White gains more and more space, when the black’s counterplay is based on the direct assault over the e5 square.
9…Ng4 10.Bf4!
At the same time white increases his piece activity, but also brings more power over the e5 and d6 squares.
Black is almost forced to play 10…f6, when 10…Be7 11.h3 Nh6 12.Rd1 with the further Ne4! Leads to the huge positional advantage for white.
Now white can’t capture the pawn on f6 at once after 11.ef? Simply because the strong recapture 11…Qf4!
The pawn e5 divides black’s position on two separate parts! The Queenside is completely out of the loop about anything that’s happening on the King’s side.
One of the most important principles of the positional game was discovered and approved by the first World Champion W. Steinitz. “The one who has advantage has to attack under the threat of wasting this Advantage.”
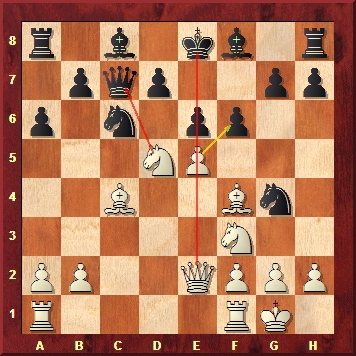
Using the bad position of the black King, which is still stuck in the center, white comes with a nice tactical blow, which immediately demolishes black’s position:
11.Nd5!!
The final accord. The knight is aiming at the black Queen, that forces him to accept the sacrifice. After 11…Qa5 12.ef there is no way to stop 13.Nc7+
11.exd5
Getting rid of the e6 pawn – the “e” file has been opened and that allows white to come up with the massive strike.
12.exf6+ Nce5 13.Nxe5 Nxe5 14.Bxe5 Qxc4
Seems that black is still alive, however after
15.fxg7!

The smoke has totally cleared up. Black’s position is lost after either 15…Bg7 16.Qh5+ with a mating attack or 15.Qe2 16.ghQ that leads to huge material loses.
Black resigned
Filed under: Morra Gambit |


Hello,
First, I would like to thank you for your excellent and very interesting website. However, I have just a little question to ask you : why, in the Morra gambit, do you play 5. Bc4 ? Personnaly, I prefer to play 5. Nf3, because after e6, I think that the bishop is better on d3 (aiming at h7) rather than on c4 (because f7 si protected now)
Thank you for your Answer
Dear Bardamu,
Unfortunately Bd3 stands more passive then on c4. In the Morra Gambit – White usually prefers the control over d5 square , then dreaming about checkmate on h7 :).
Play 5. Bc4!
I think after 11.Nd5 Qa5 12.ef d6 will stop the treat Nc7. I also want to ask about 5.Bc4 instead of 5.Nf3, which in Alex Lenderman’s training video of the same variant is prefered, and I think the reason is that if blacks move 5…e6 whithe will move 6.Nf4 to explit de open diagonal. Can you tell me what do you think about this? Thank you!
what should you play if the black bishop pins the knight on B4?
what if black play on move 10 b7?
what happens when black play b5 on move 10?
Dear Mr. Alterman
I tried this line today on ICC but my opponent replied 6…Be7 and 6…d6. What should I play in response?
11…Qa5 is met by 12.exf6 d6 13. Fxg7 Bxg7 14. Bxd6! renewing the threat on c7. 14…Kd7 defending the c7 square is met with 15.Bc7!!. The Black queen now only has one square to run to, c5, where it is then trapped by 16. Bb6.
Your line isn’t correct: 11…Qa5 12.exf6 d6 13.fxg7 Bxg7 14.Bxd6! Kd7 15.Bc7!! Qc5 16.Bb6 doesn’t trap the Queen as it can still move to d6 or f8.